Installing a modern smart thermostat in a historic home can feel like a clash between two worlds. Homeowners often worry about compatibility with older HVAC systems, the lack of modern wiring, and the desire to avoid damaging period-specific plaster or woodwork. The good news is that achieving energy efficiency and smart control is now entirely possible and affordable, even in century-old residences, by choosing the right thermostat and smart installation techniques.
The Historic Home Challenge: The Missing C-Wire
The primary hurdle in retrofitting a smart thermostat into a historic home is the lack of a “C-wire” (Common wire). Older, two-wire thermostat systems often only include wires for heating (R) and fan (G), relying on batteries for power or “power stealing”—methods insufficient for the constant power draw of a Wi-Fi-enabled smart device.
- The Affordable Solution: No C-Wire Required Models: The most cost-effective solution is choosing smart thermostats specifically designed to run without a C-wire. The Google Nest Learning Thermostat (though sometimes pricier) or certain models from brands like Ecobee and Amazon Smart Thermostat have versions that include battery power or a power-stealing mode optimized for older systems. While they may require occasional charging or replacement of batteries, they eliminate invasive wiring work.
Compatibility and System Checks
Historic homes often have low-voltage (24V) furnaces, radiant heat, or boilers, which may not be multi-stage systems.
- Choose Simplicity: Affordable models like the Amazon Smart Thermostat or the Sensi Lite are excellent choices because they are often less expensive and designed to work with basic, single-stage heating and cooling systems commonly found in older houses. They provide the core smart features—remote control and scheduling—without the complexity (or cost) of systems built for modern, multi-stage HVAC.
- The DIY Advantage: For the budget-conscious homeowner, installation is often a simple DIY project. After turning off the power at the breaker, installation involves simply labeling and swapping the old R and W (heat) wires to the new terminals. This ensures you maintain the home’s historic integrity by avoiding new holes or plaster damage.
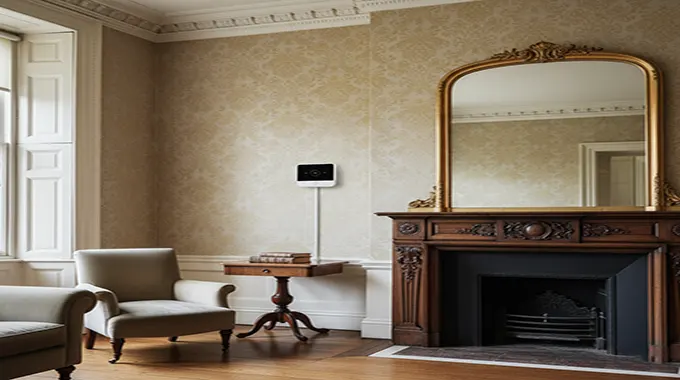
Minimizing Aesthetic Impact
A gleaming new touchscreen can look jarring against antique wainscoting.
- Mounting Plates: Many smart thermostats come with a trim plate designed to cover the footprint and potential paint discoloration left by the old thermostat, minimizing the need for touch-ups.
- Remote Sensors: To optimize temperature readings without relocating the thermostat—and damaging your wall—use wireless satellite sensors. Brands like Ecobee and Nest offer these affordable add-ons. You can place the main unit in an inconspicuous spot and rely on a small, unobtrusive wireless sensor placed in a more central or utilized room.
By prioritizing C-wire-less or C-wire-optional models and focusing on basic, affordable smart units, homeowners can achieve significant energy savings (often up to $180 annually) without compromising the historical integrity of their cherished home.